
Beginners Guide to SwiftData
SwiftData is an O/RM (Object-Relational Mapping) framework introduced by Apple in WWDC23. Built on top of Core Data, it also shares some of the basic functionalities. However, it seamlessly integrates macros for an improved API experience and is designed explicitly with SwiftUI in mind.
SwiftData is an O/RM (Object-Relational Mapping) framework introduced by Apple in WWDC23.
Built on top of Core Data, it also shares some of the basic functionalities. However, it seamlessly integrates macros for an improved API experience and is designed explicitly with SwiftUI in mind. [1]
This article will review how to integrate SwiftData into your apps and how it differs from Core Data.
Object-Relational Mapping
Before diving deep into SwiftData, it is essential to understand what is O/RM.
According to Wikipedia:
Object–relational mapping (ORM, O/RM, and O/R mapping tool) is a programming technique for converting data between a relational database and the heap of an object-oriented programming language. [2]
It's the layer between a database and the elements allocated in memory in a programming language.
O/RM may sound intimidating, but it's used in many programming languages. For example, in Java, you have Hibernate, and in Python, you have Django.
You can use many frameworks in Swift, the most popular ones being Core Data, Realm, and SwiftData.
But why would you need to use ORM frameworks in Swift?
When building an application, it's common to have features for offline use. For example, users should have access to some data in the app when fetching from a remote API does not work (the API not working could be because the user does not have internet access). This technique is called caching data to the device.
Here's a diagram to exemplify how caching works.
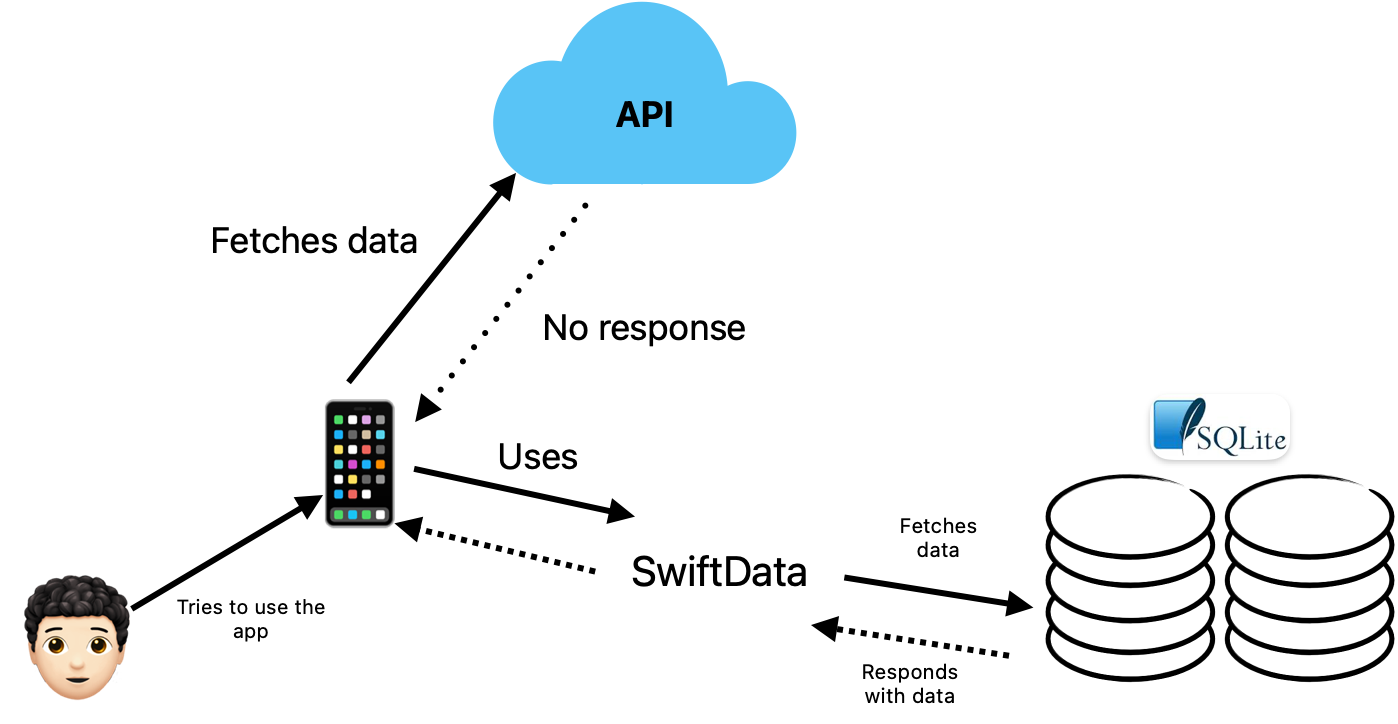
But how could the caching implementation be applied?
The data to show the user should be persisted on the device in a database that the app can visit.
That's where frameworks like SwiftData come in. They act as a layer between the app and the database.
Starting With SwiftData
Now that the basics are set, it's possible to review the basic operations that can be done with SwiftData.
Example
An app incorporates a list of a user's friends. The user can add, remove, or edit friends at any time.
A friend could have a name and date of birth.
The list of friends was saved into the device locally and could be accessed without the internet.
From the example, it's possible to extrapolate the following Model.
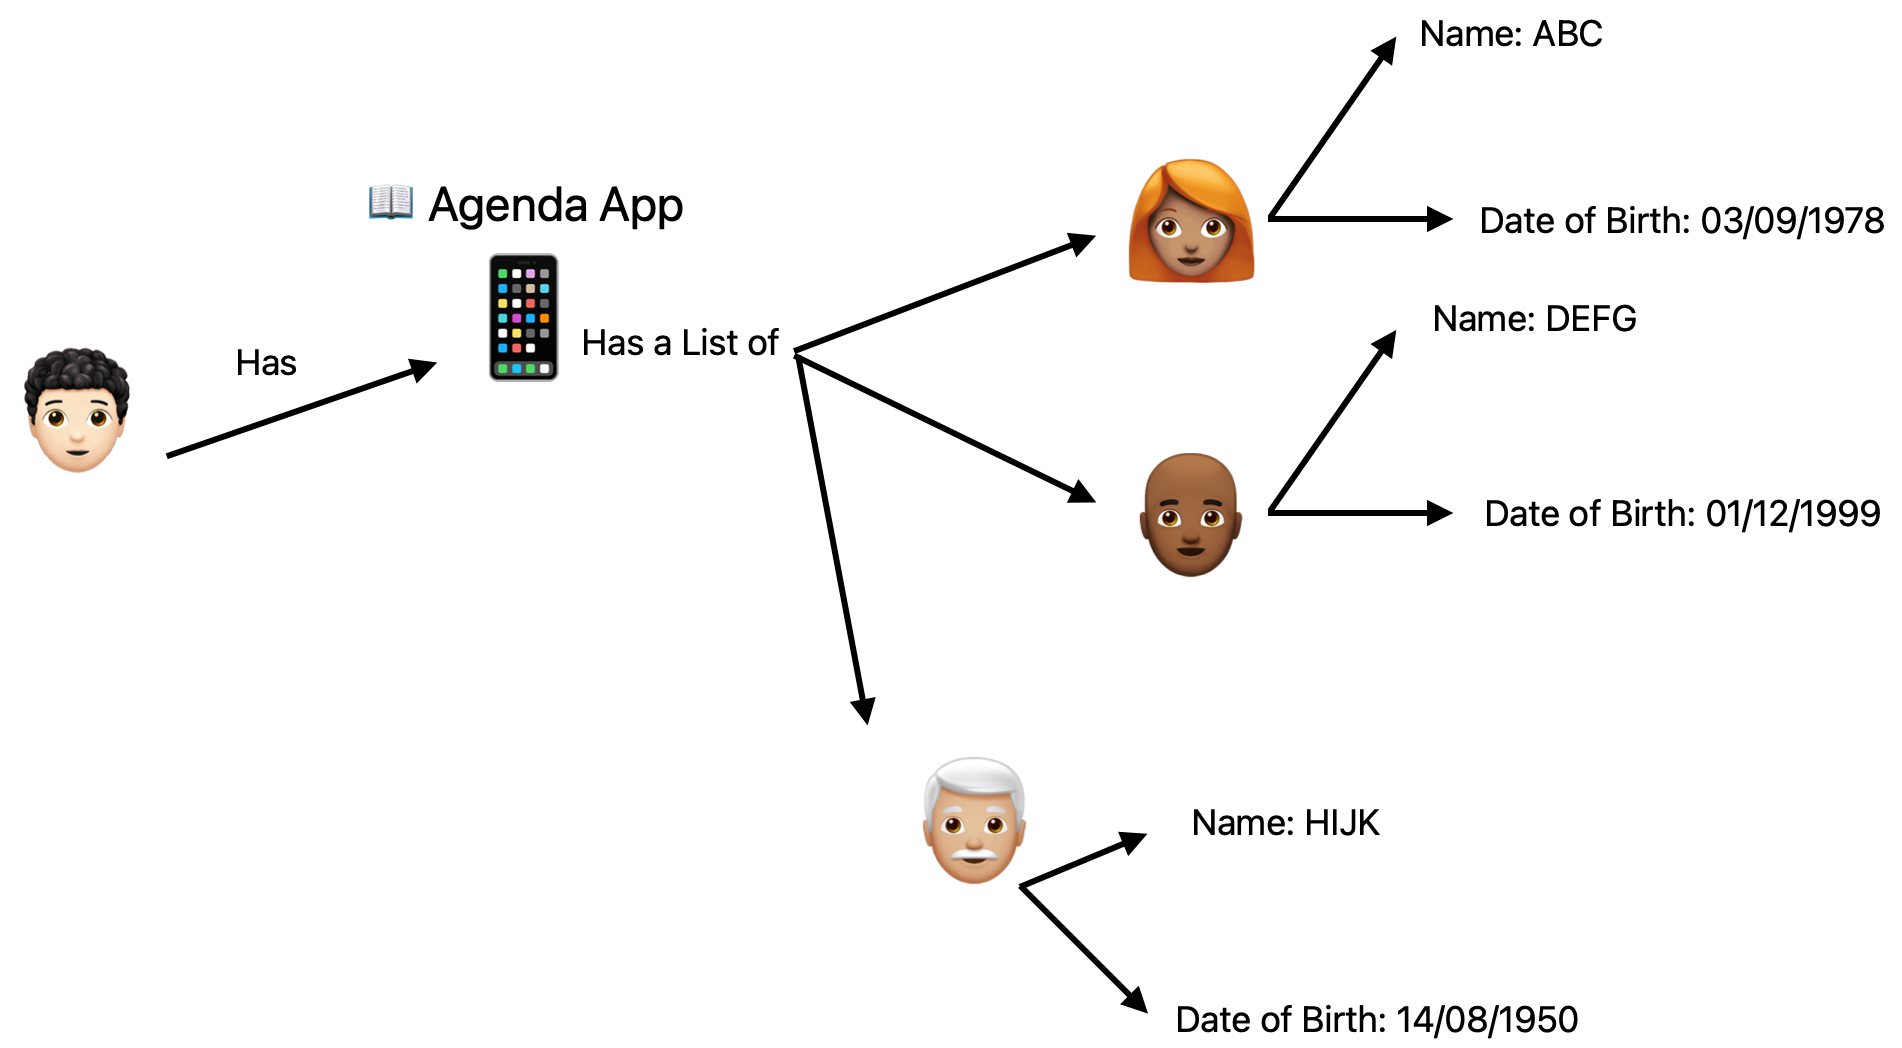
In Swift, the Friend object would be an object that would represent each person on the agenda.
Since the Friend will be stored in the database, the macro @Model should be called before declaring the object.
  import Foundation
  import SwiftData


  @Model
  class Friend {
      let name: String
      let birthday: Date
  }
The macro Model will convert the object into a stored model managed by SwiftData [3].
When this view is called in production code, attaching the .modelContainer modifier with the Friend class to the view that will be using this Model [3] is essential.
  import SwiftUI
  import SwiftData


  @main
  struct AgendaApp: App {
      var body: some Scene {
          WindowGroup {
              ContentView()
                  .modelContainer(for: Friend.self)
          }
      }
  }
The operations will be in the view created in SwiftUI (ContentView in this case).
To manipulate data, instead of the usual @State property, this will be changed to a @Query. This macro fetches all of the instances of the attached model type. It can also be used to filter and sort the data that will be presented [4].
Finally, to manipulate the data by calling upon the context, a Model Context through an environment value is necessary.
This model context is the connection between the view and the container that was added as a modifier before [3].
  struct ContentView: View {
      @Query private var friends: [Friend]
      @Environment(\.modelContext) private var context

      ....
  }
Everything is set up to do all operations, such as save, delete, and edit.
Insert Data
To save data to the database, the only instruction necessary is to call the context and call insert with the desired object of type Friend.
  ...
  let newFriend = Friend(name: newName, birthday: newDate)
  context.insert(newFriend)
  ...
But should the context call the save() to save all the changes done to the database?
According to Apple, with SwiftData, it's unnecessary due to the autosaveEnabled.
A Boolean value that indicates whether the context should automatically save any pending changes when certain events occur.
The default value isfalse. SwiftData automatically sets this property totruefor the model container’smainContext[5].
However, it's essential to be careful with auto-save and should be avoided since the save will be called at various times in the lifecycle [5].
Delete Data
To delete data from the database, the only instruction necessary is to call the context and call delete. With the Model needed to delete.
  ...
  for index in offsets {
      context.delete(friends[index])
  }
  ...
Edit Data
If, for some reason, the user wants to edit one of their friends in their agenda, additional logic would be necessary to show a detailed view of each Friend.
This detailed view can create new friends or edit those already on the agenda. This view would expect to receive a Friend object that is either blank (to add new friends) or already filled out (to edit the information of friends).
The same view will be used. However, there is one important difference. When the user chooses to edit, an array element from the @Query will be passed to the view. This means that any changes done to this instance will be automatically reflected in the database.
Conclusion
SwiftData is very powerful, especially if you're familiar with macros and SwiftUI. However, it does have its limitations. It can only be used on devices with iOS 17 and above, and since it's fairly new, it might be intimidating to some developers.
If you enjoyed this article, check out the tutorials created by Apple on SwiftData, such as Save Data and Create Update, and Delete Data.
If you want to check the code I presented in this article, please check my repository on GitHub.
It brings me great joy to create free educational content. If you enjoyed this article, consider following me on social media like LinkedIn, GitHub, and Twitter.
Thank you, and have a great day 🌞.
References
[1] Meet SwiftData, Apple WWDC23: https://developer.apple.com/videos/play/wwdc2023/10187
[2] Object-relational mapping, Wikipedia: https://en.wikipedia.org/wiki/Object–relational_mapping
[3] Save Data, Develop in Swift: Tutorials: https://developer.apple.com/tutorials/develop-in-swift/save-data
[4] Query(): Apple Developer Documentation: https://developer.apple.com/documentation/swiftdata/query()
[5] autosaveEnabled: Apple Developer Documentation: https://developer.apple.com/documentation/swiftdata/modelcontext/autosaveenabled