
How to Setup Your Own Blog
Have you ever wondered how you could set up your blog? Even when searching online, it's challenging to understand what you need. How does everything work? In this article, I aim to tackle this by giving you a step-by-step tutorial on how you can set up your blog in minutes.
For this example, I'll use Ghost, a blogging platform that helps you quickly create a fully featured blog or website. I use it on this blog (codingwithvera.com), but you can use it on many other platforms. The process is the same as it will be explained here.
Setting Up Your VPS
We can now purchase your VPS, essentially the machine on which your website will be stored and run.
You may say, what if I self-host my website?
You can, of course, but know that when you turn off your machine, the website will also be down. You may also be more prone to hacking, and more data would be lost in this case.
That's why I recommend you use a Virtual Private Server (VPS).
There are many options, and it doesn't matter where you purchase it.
I suggest you purchase a VPS with at least 4 GB of RAM and 2 or more CPU cores. Ideally, it would have 4.
After you can access your VPS, I recommend using an SSH key to log in. The only way you can access it is through your terminal. To learn more about SSH keys, please visit this GitHub Docs.
For security reasons (to prevent others from accessing your machine's address), please create a login for yourself on that machine and disable the root login after that.
Choosing a Domain Name
First and foremost, you need a domain. This will be the name of the website that you want to create.
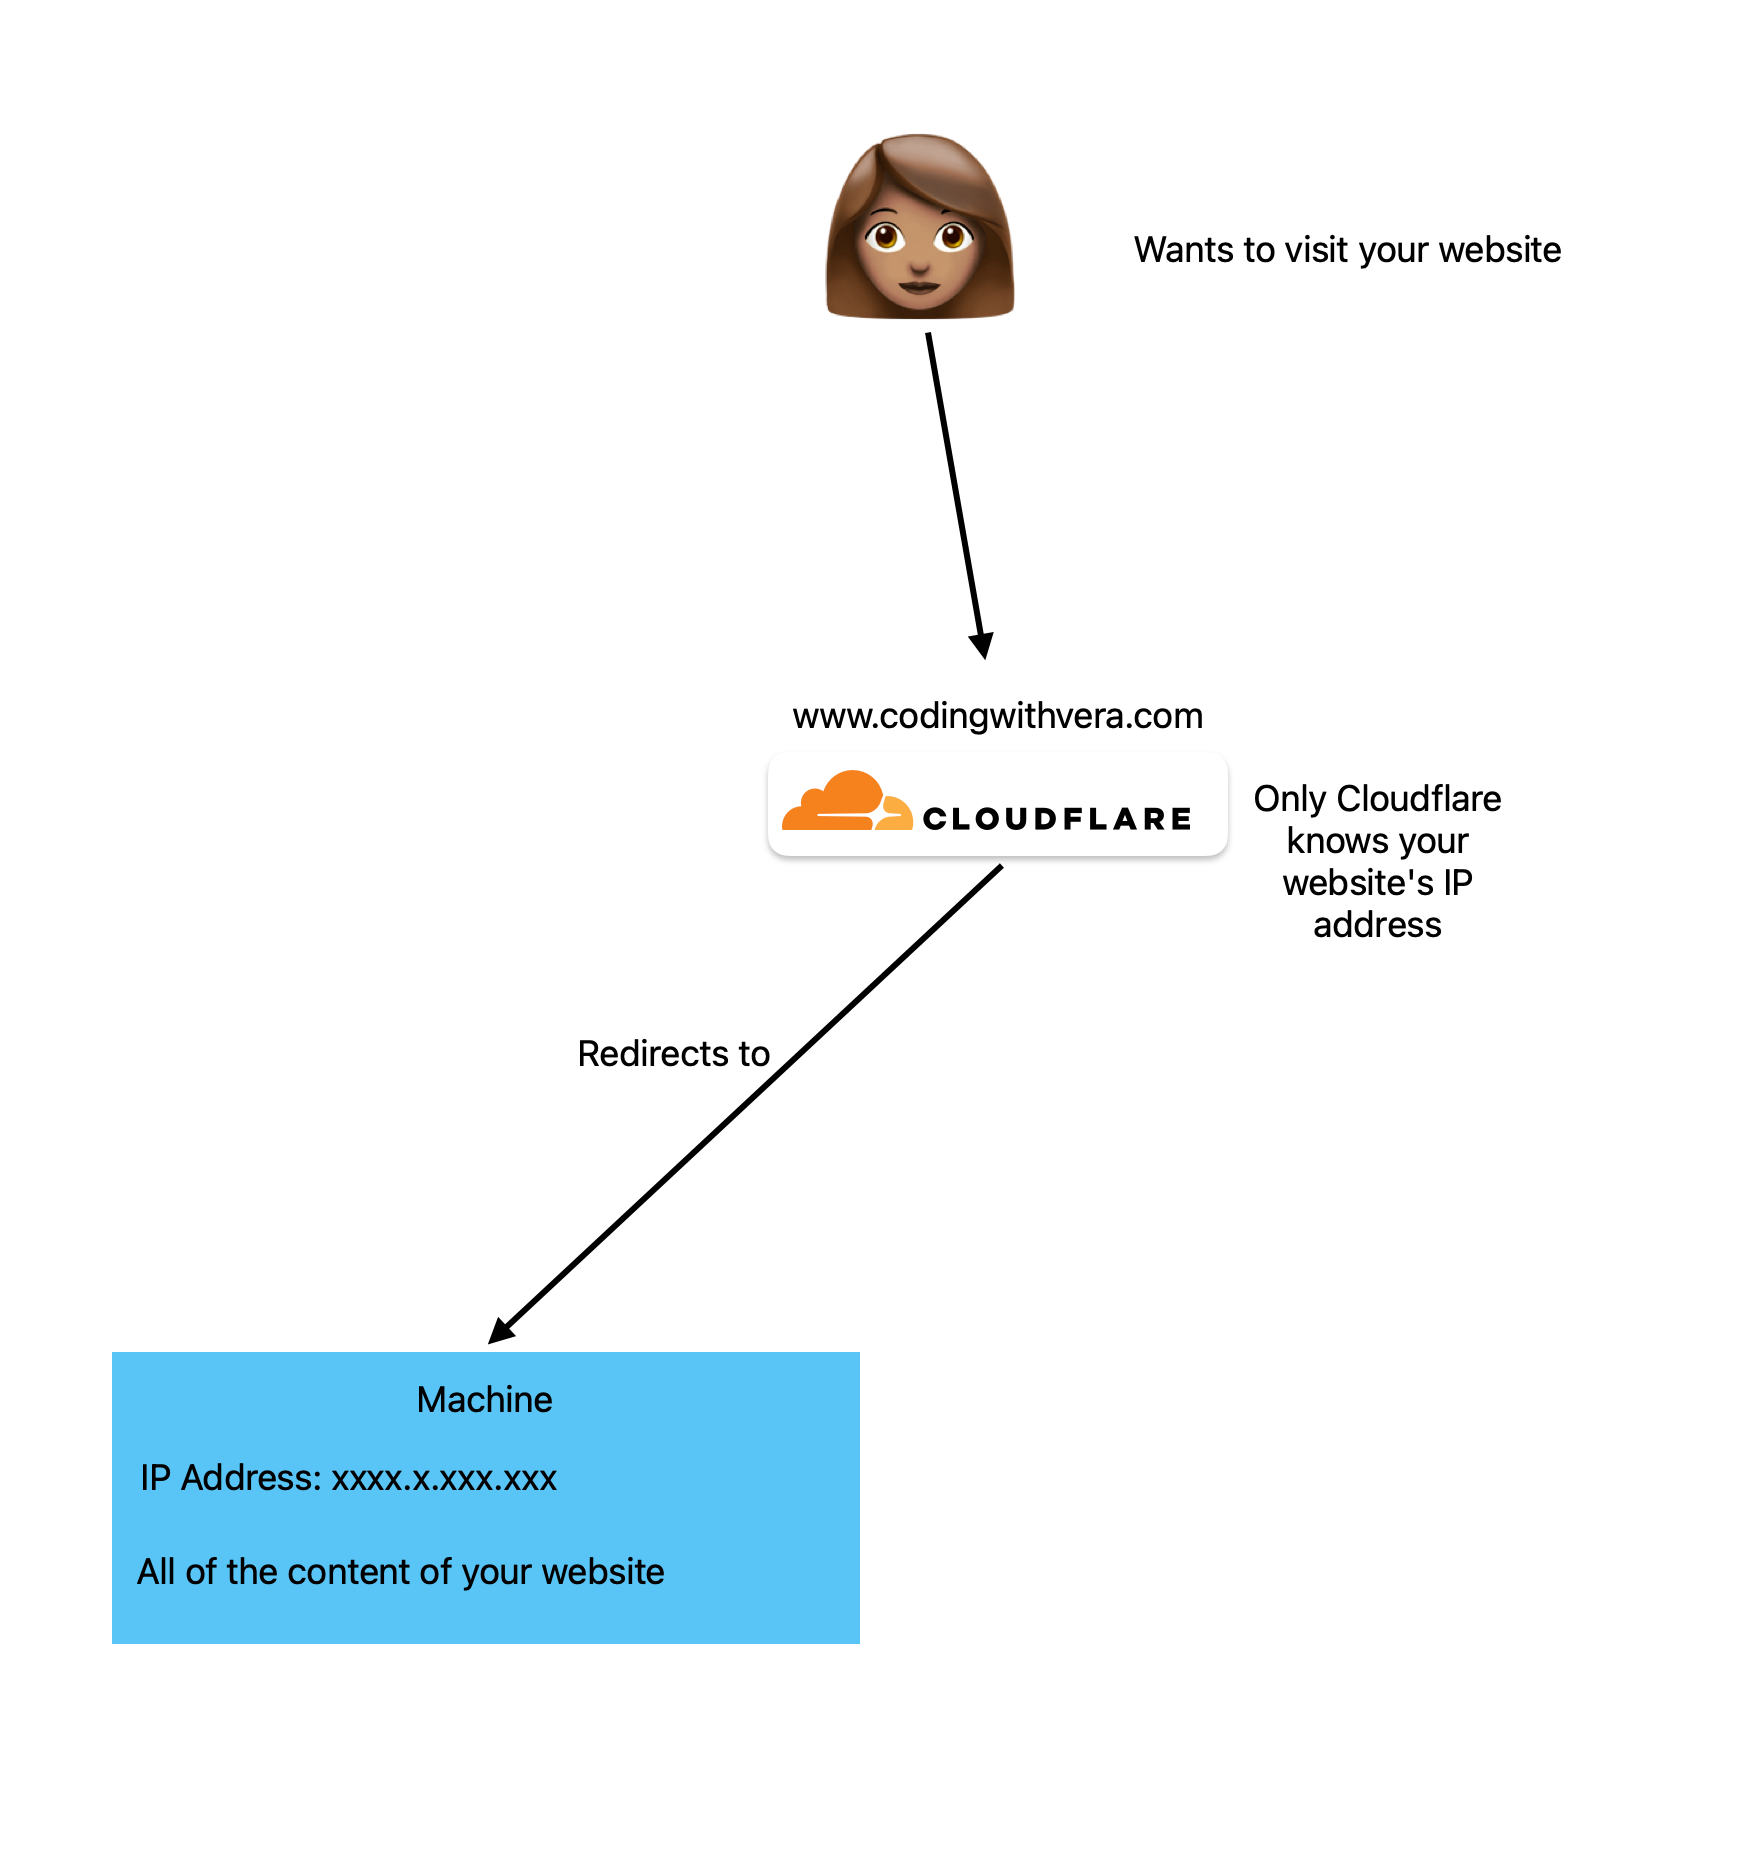
You can see this as a mask of where your website is running. Your website will run on a specific IP address. However, ideally, you don't want to expose that to the outside world to reduce the number of malicious requests or attempts to access your server, so by using Cloudflare, you introduce a proxying layer that will masquerade your actual IP (and the traffic) from clients.
Take a look at the following illustration.
So, choosing a domain will be the first step when setting up the blog.
There are many websites where you can do this. If you're lucky, you might even get your domain for free. However, domains are usually cheap.
I used godaddy.com, but you can use whatever is most convenient.
After registering your domain, you will receive some information about it. For now, let's save it and move to the next step.
DN What?
If you look at the previous illustration, I added the Cloudflare logo. Cloudflare and other services like it have the feature of being a DNS provider. But what's a DNS?
DNS stands for Domain Name System. To help the device access your website, you will need a DNS that translates the domain you just gave into the IP address of the website.
I usually use Cloudflare, but, as stated before, you can use other options.
Pre-Requisites
- Already own a domain name (executed the last step)
- Have a Cloudflare account
When ready, you must review the DNS records for your purchased domain. This will require some back-and-forth between the website where you bought your domain and Cloudflare. Since Cloudflare's official tutorial is extensive, I highly advise you to complete it before moving forward to the next step.
Building the Website
Now that you have all of your tools, we can learn how the website will work on your machine.
What would be the best approach to running a server on a machine?
How would you do it?
First, you would probably need Ghost, a database to allocate the data for your blog (to save the blog posts, images, etc.). The easiest way to do this is to use Docker.
What is Docker? 🐳
If you never heard of it, Docker is a platform to build and run container applications.
And what is a container, you may ask?
A container is an isolated instance running an application, simple as that.
The main advantage of using Docker for this case is that you only need to write the configuration down once and quickly share it with others or replicate it on different servers.
Creating Your Docker Compose 💿
To run the application, you may need a file specifying everything you need and the rules on which your containers will be run.
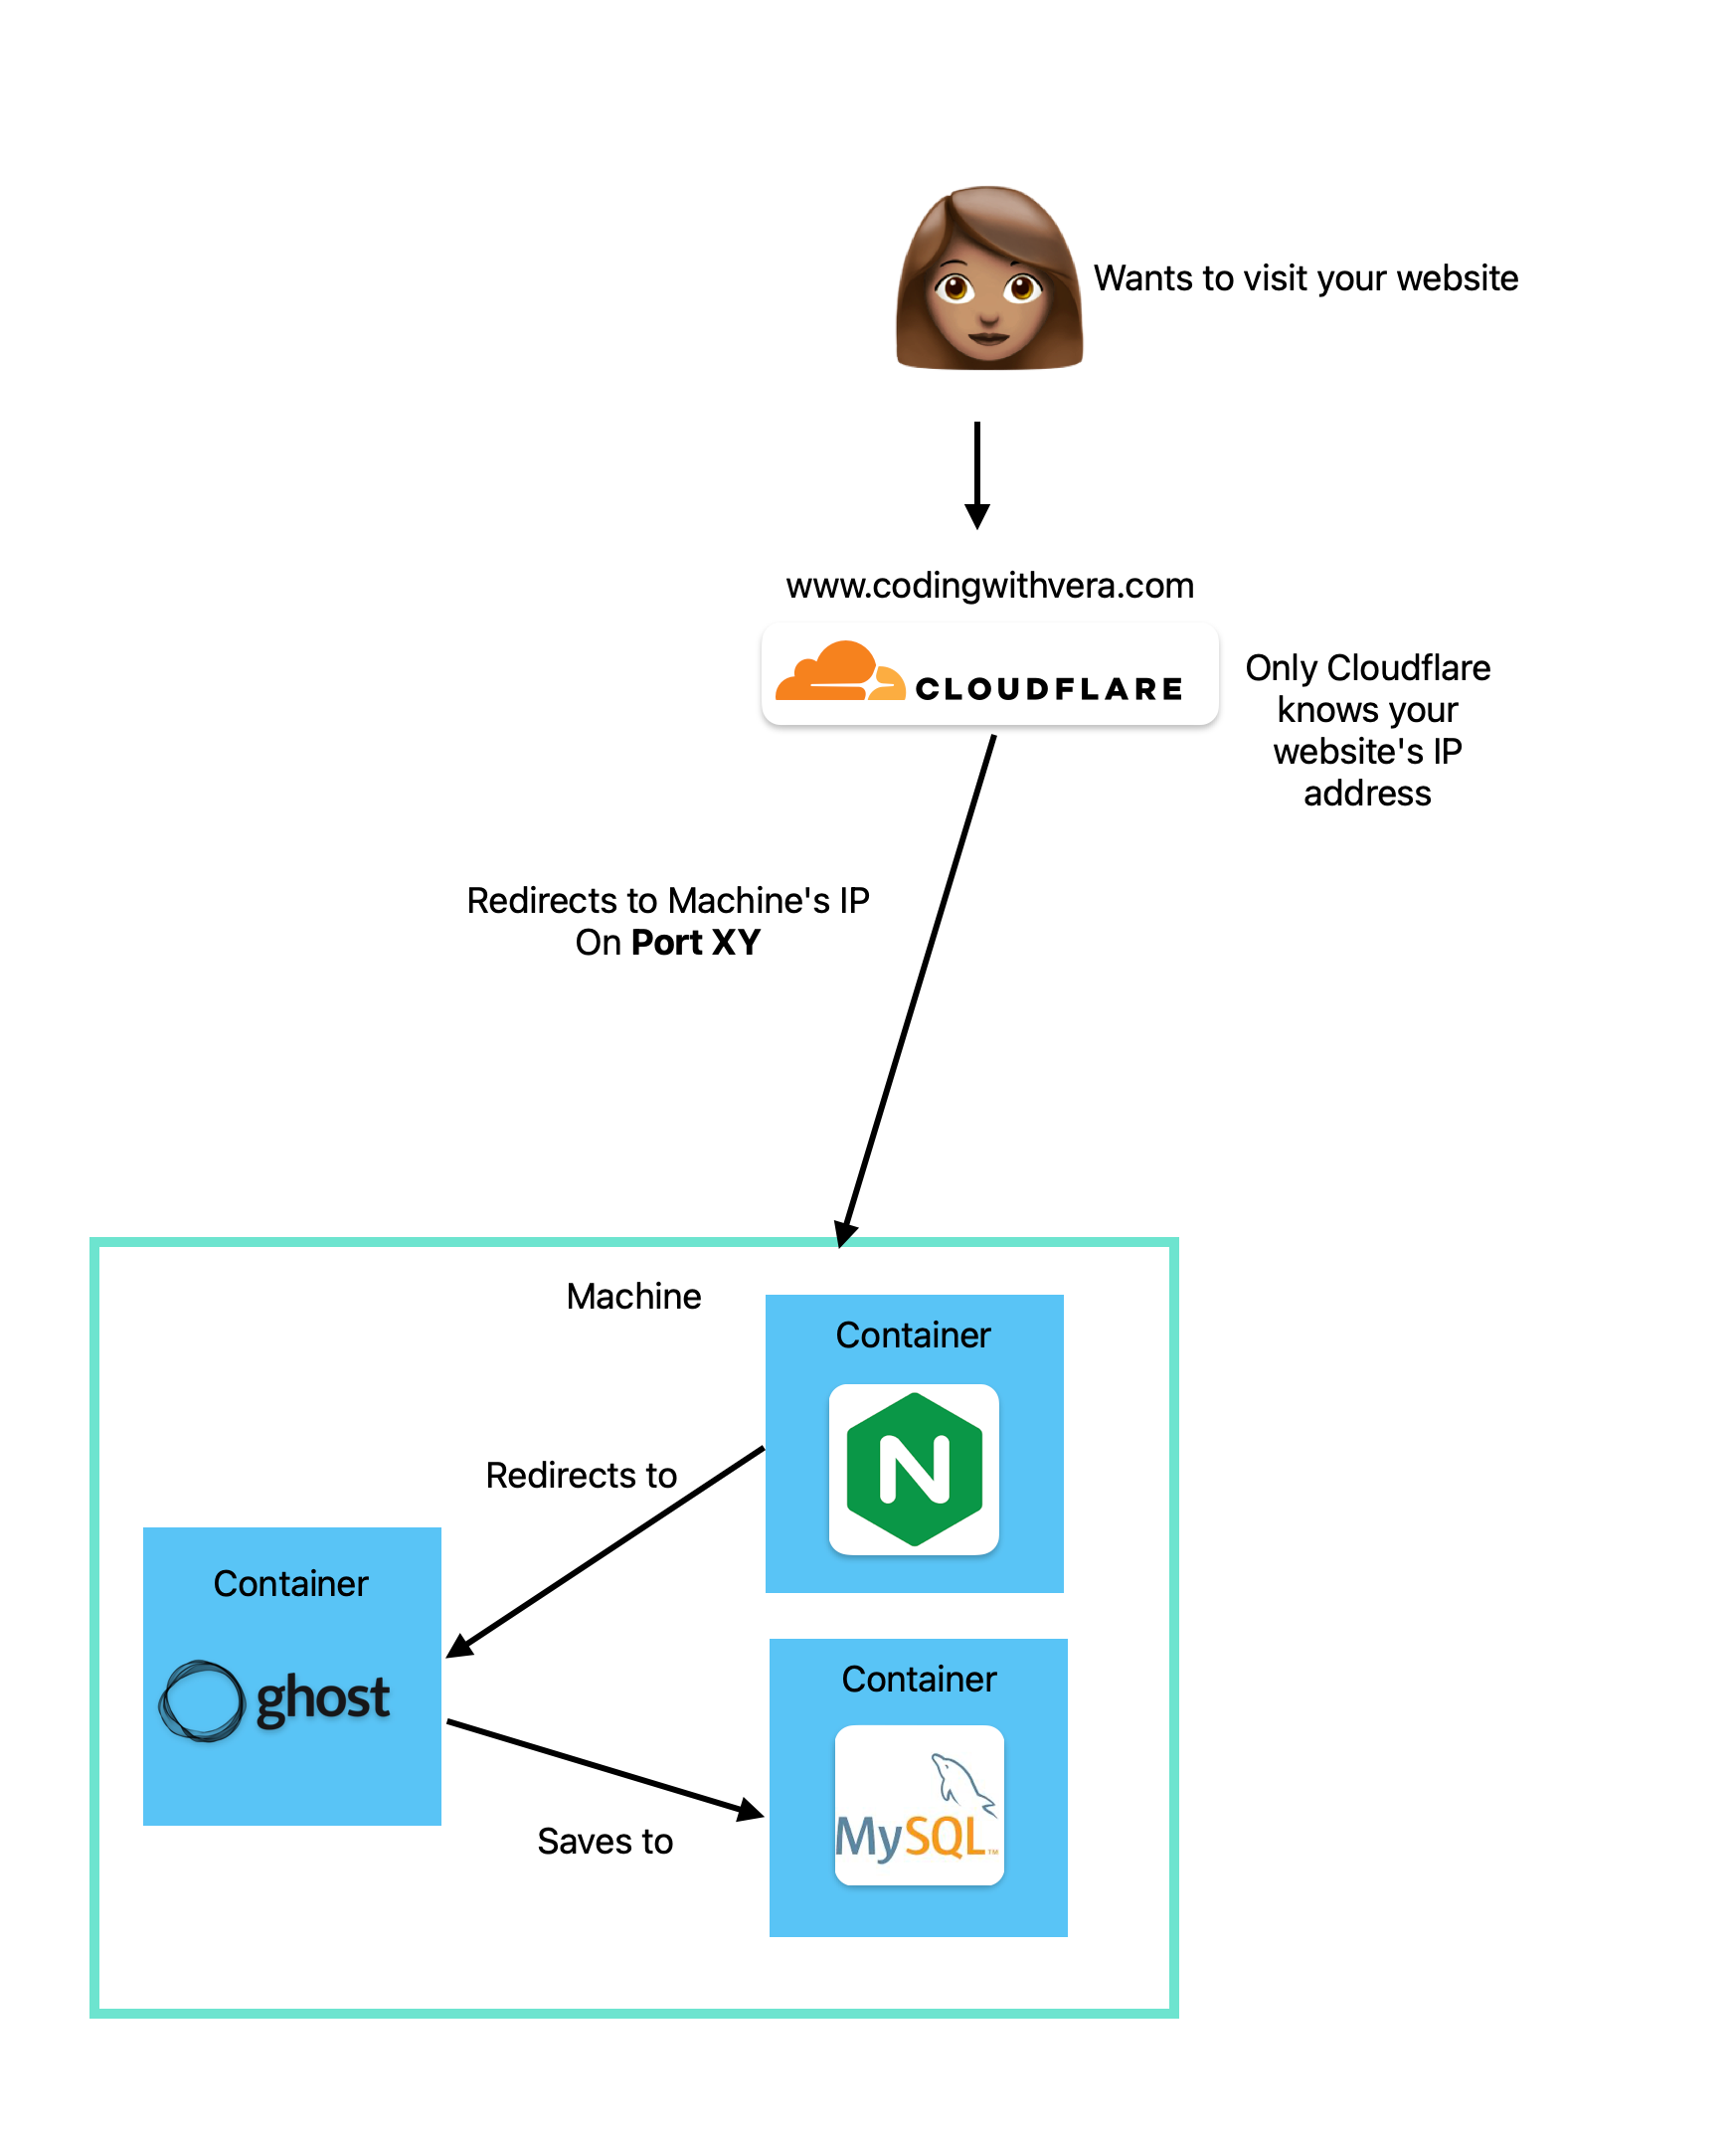
In this file, you will declare the images of the applications we defined before (Ghost, a Database) and Nginx (I will explain why later).
But before we dive into the code, what is an image?
The best way to represent this is by thinking of a CD 💿. We don't use them anymore, but CDs usually carry a "pure" version of something you could install on your computer. After installing a game, for example, you could change it however you wanted.
But no matter the changes, you could always return to the CD, right? Well, the images in docker work very similarly.
So, for this step, we need to get an image for Ghost, MySQL (you can use any DB you want), and Nginx.
Why Do We Need Nginx?
Nginx is one of the docker images we will need. I haven't discussed it yet.
This web server receives the request from your browser and directs it to your Ghost container.
You will need a configuration for your Nginx container. You should create it on a configuration file. It can have any name as long as it has the extension .conf.
Check the example below of the configuration file that I provided on GitHub.
 Sailor-Saturn
You might have noticed some mentions of SSL certificates in the Nginx configuration. You need this to ensure that your website's communication is encrypted.
Let's use the previous illustration, but specify what's happening behind the scenes on your server.
Building Your Docker Compose
From the previous illustration, it seems that the instances interact. How can we achieve this with docker?
As I said before, we need to specify the docker-compose, a script for how everything interacts.
I've created a repository with an example of how my docker-compose is set up. Use the link below to check it out.
Sailor-SaturnRunning the Instance
Now it's time to test your composer file. Make sure you are in the directory of your docker-compose file.
To do this, run this command on your server.
docker-compose up -d If everything went well until now, you can check your website using the domain name you purchased in the previous steps.
More often than not, it might take you a couple of tries to set up this correctly; the same happened to me, so don't lose hope!
And you're done! 🎉
I hope you enjoyed this tutorial, and I can't wait to see your own blog available online! 🫶
Drop me an e-mail at vera at codingwithvera dot com. ✨
References
- https://www.godaddy.com/
- https://developers.cloudflare.com/dns/zone-setups/full-setup/setup
- https://docs.github.com/en/authentication/connecting-to-github-with-ssh/generating-a-new-ssh-key-and-adding-it-to-the-ssh-agent
- https://www.veeble.org/kb/disabling-root-login-and-creating-sudo-user-for-vps-security/
- https://docs.docker.com/guides/docker-overview/
- https://nginx.org/en/
- https://github.com/Sailor-Saturn/Ghost-Blog-Configuration/