
Get to Know Swift Testing
At this year's WWDC, Apple unveiled Swift Testing, a new testing framework. This does not replace XCTest, which iOS developers were already using, but it enhances the introduction of our test writing practices with new features such as tagging, parameterizing testing, and more.
According to Apple, this tool is more descriptive, organized, and scalable and features Actionable failures.
How to Import
From Xcode 16 onwards, Swift Testing will be the default choice when creating a new test target. You should import the module Testing into the file for your tests.
Before:
import XCTestAfter:
import TestingHow to Create a Test
When using XCTest, if you wanted to implement a test, you would create a function that starts with the name test. Now, you need to add the macro @Testable before declaring the function, and Xcode will automatically know that it is a test.
Before:
import XCTest

final class CodingWithVeraTests: XCTestCase {
    func test_example() {
      ...
    }
}
After:
import Testable

final class CodingWithVeraTests {
  @Test func test_example() {
    ...
  }
}How to Assert
Previously, when you wanted to assert an expectation, you would use XCTAssertTrue or some other variation to declare a value inside the test.
You can call the macro #expect and add a boolean condition inside.
Before:
import XCTest

final class CodingWithVeraTests: XCTestCase {
    func test_example() {
      let a: String = "Test"
      let b: String = "Another Test"

      XCTAssertEqual(a, b)
    }
}
After:
import Testable

final class CodingWithVeraTests {
  @Test func test_example() {
      let a: String = "Test"
      let b: String = "Another Test"

      #expect(a == b)
  }
}
How to Check The Test Results
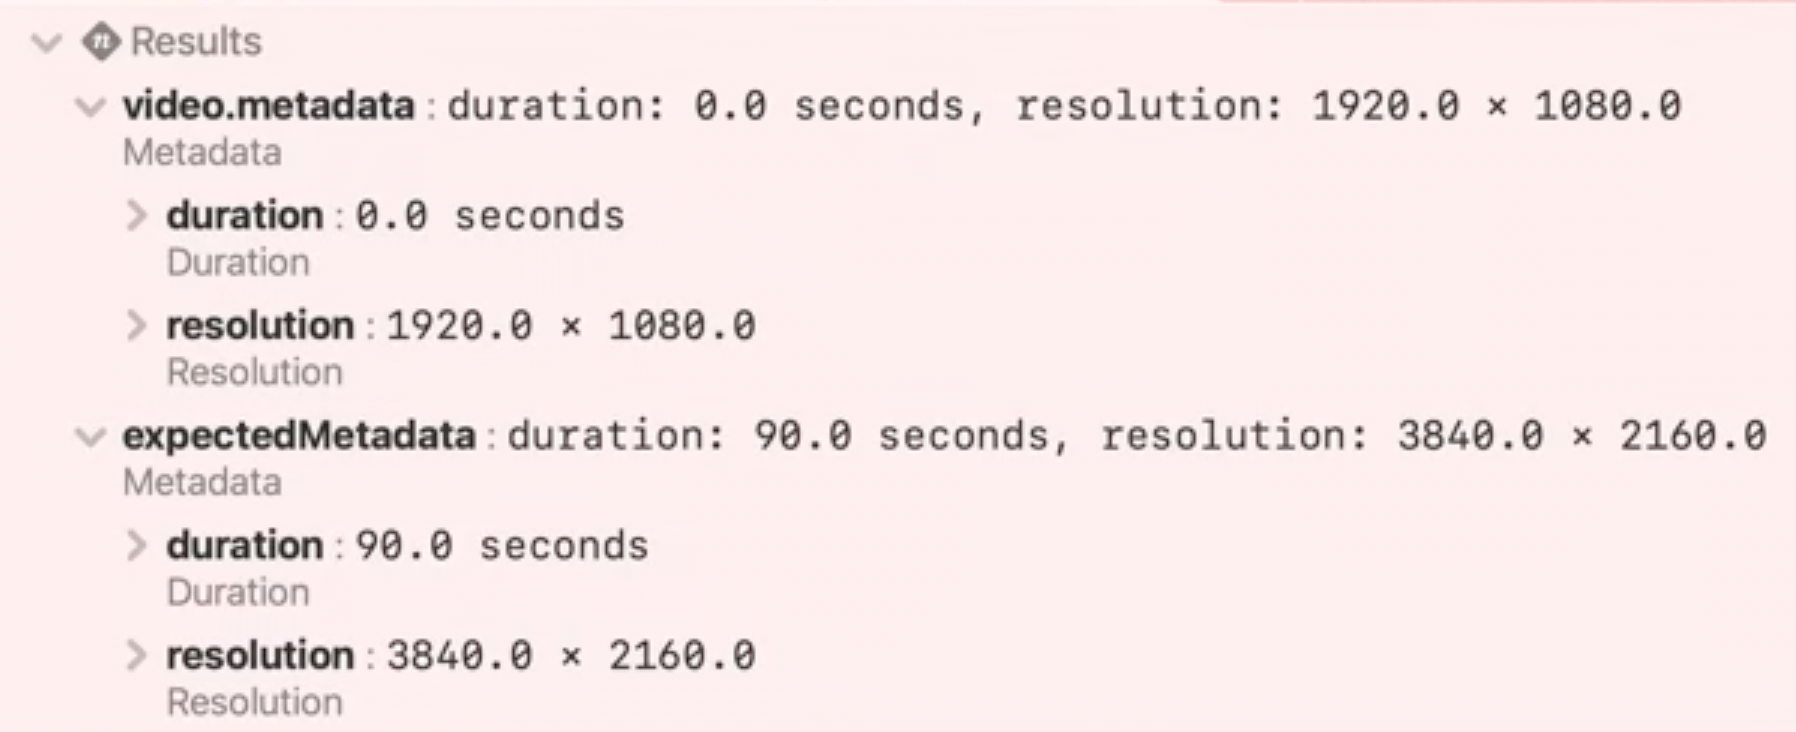
One of the major selling points of Swift Testing is the detailed failure message. Before, the developer needed to add extra information in the assertion description in case it failed so it could get more details as to why it failed.
Here's an example from one of my projects.

If we create arrays or even more complex objects, it becomes even more challenging to understand what went wrong.
Now, with Swift Testing, the difference is more detailed and organized. Check this result from WWDC24: Meet Swift Testing Session.
After:
How to End a Test Earlier
Sometimes, you don't want to continue running a test if it fails after a certain point. In these cases, you likely use an XCFail with the assertion to prevent the test from continuing to run.
Now, you can use the #required macro. For this, you need to use the keyword try since it will throw an error if the assertion fails.
After:
import Testable

final class CodingWithVeraTests {
  @Test func test_example() {
      try #require(3 != 2)

      let a: String = "Test"
      let b: String = "Another Test"

      #expect(a == b)
  }
}Swift Testing is an open-source software designed for Swift that embraces concurrency and macros.
Add a Display Name
To make each test more explicit, you can also add a display name for your test that will appear in the project navigator.
Before, you could only specify the test name through the method name, but now you can create an easy-to-understand name that can appear on the project navigator.
Before:
import XCTest

final class CodingWithVeraTests: XCTestCase {
    func test_testingIfTwoStringsAreEqual() {
      let a: String = "Test"
      let b: String = "Another Test"

      XCTAssertEqual(a, b)
    }
}
After:
import Testable

final class CodingWithVeraTests {
  @Test("Check if two strings are equal") func test_example() {
      try #require(3 != 2)

      let a: String = "Test"
      let b: String = "Another Test"

      #expect(a == b)
  }
}
Traits
You can also increase the customization by adding traits like we did before with the test name. Here are a few examples of what you can do with them:
- Disable a test:
.disabled("Description of why is disabled") - Reference an issue:
.bug("link-example.com", "Bug name") - Set a time limit:
.timeLimit(.minutes(10)) - Create a tag:
.tags(.nameOfTag)
As you can see, this framework allows plenty of more customization for your tests, especially with the tag feature that didn't exist before.
Why Are Tags Important
If your codebase is big, it's common to have tests with the same conditions in different files. But if you want to keep running them for whatever reason, you won't be able to do that serially. You would need to run them manually one by one.
By organizing them into tags, you can easily run a group of tests that otherwise would be difficult to run (an example would be flaky tests; you could group them by a tag and run them several times together).
Another advantage of tags is you can filter the tests in the test report by tag, and they can be shared across multiple projects and, most likely, modules.
Suites
The last and final building block for this framework is Suites. As I've said, we are no longer forced to use classes to implement tests. We can use structs, or the test can even be a global function.
But now, with the implementation of Suites, we can go even one step further and reduce the setup time for each test. These groups are related to test functions and suites; for each test you create, you will already have a suite instance associated with it to avoid state sharing.
With this, you can set a common variable before each test, and since every test function has its suite instance, it won't share state.
Example:
import Testable

struct CodingWithVeraTests {
  let a: String = "Test"
  let b: String = "Another Test"

  @Test("Check if two strings are equal") func test_example() {
      #expect(a == b)
  }

   @Test("Check if two strings are different") func test_example2() {
      #expect(a != b)
  }
}
Parameterized Tests
Another limitation of using XCTest is that it requires repeating the same test and changing small parameters. With Swift Testing, you can add a parameter or multiple parameters and call them in the test.
Before:
import XCTest

final class CodingWithVeraTests: XCTestCase {
    func test_firstStringWithOtherStringNotEqual() {
      let a: String = "String 1"
      let b: String = "Other String"

      XCTAssertEqual(a, b)
    }

    func test_secondtStringWithOtherStringNotEqual() {
      let a: String = "String 2"
      let b: String = "Other String"

      XCTAssertEqual(a, b)
    }

    func test_thirdStringWithOtherStringNotEqual() {
      let a: String = "String 3"
      let b: String = "Other String"

      XCTAssertEqual(a, b)
    }
}
After:
struct CodingWithVeraTests {

  @Test(
    "Check if two strings are equal",
    arguments: [ "String 1", "String 2", "String 3"]
  ) func test_example(stringToTest: String) {
      #expect(stringToTest == "Other String")
  }
This allows you to easily add new parameters to the same test without the overhead of creating a new test.
Conclusion
XCTest is a robust and reliable framework many iOS developers use for their tests. During the 2024 WWDC, Apple added a new, more descriptive framework that will be the default when creating a new project starting from Xcode 16.
With all of these new super-powers the implementation of tests will be even more accessible, however, it's important to note that we can still reach most of this with XCTest.
Hope you enjoyed reading this article, let me know your thoughts!
References
Swift Testing Official Documentation: https://developer.apple.com/documentation/Testing
Meet Swift Testing: https://developer.apple.com/videos/play/wwdc2024/10179/
WWDC24 Platform State of the Union: https://developer.apple.com/videos/play/wwdc2024/102/
Official GitHub:
https://github.com/apple/swift-testing